Strobing for Fun & Flapjacks
![]()
It seems like you can’t go anywhere on the internet without someone mentioning strobing. Just to recap, strobing is when you apply illuminators to your face without contouring. There’s a little more to it, but that’s the basics. I’m not sure where this term originated but in the past I just called the technique highlighting.
Frankly, strobing is totally my speed. I’ve technically been strobing for many years since I started trying highlighters from Everyday Minerals. Plus, contouring was just a little too complicated for my liking. I suspect that facial structure is a determining factor in contouring that is not at all addressed by tutorials. I’m convinced my face doesn’t have the right structure for the more popular forms of contouring.
Since I’ve started strobing properly—e.g., cutting back on the other shimmery face products I use—I have achieved the soft, radiant look I have desired for so long. I don’t think my face has ever looked this good.
So why strobe? First off, it’s way simpler to pull off than contouring which means you’re more likely to do it properly, and second, it’s far less time consuming than contouring.
There are a ton of recent articles on strobing, with varying advice. Here is a good article on the ins and outs of this latest beauty craze.
Get the Look
The basic idea is to keep the face matte and leave the shimmer to the highlighted portions of the face. This is to prevent the face from resembling a sparkling vampire, as well as avoiding the more practical problem of looking greasy. You should generally eschew highlighters with larger glitter, instead focusing on those with a pearlescent finish for best effect. And definitely make sure not to apply too much highlighter. We’re going for glowy, not sparkly.
Another piece of advice is that those with dry skin should stick to cream illuminators while those with oily skin stick with powder products. Those with normal and combination skin can choose to go either way. While this is not mandatory, it does help with looking more put together.
Just as with contouring, the highlighters are placed on the forehead, upper cheekbones, nose, chin, and Cupid’s bow. The main difference between strobing and contouring is that the step of shading with bronzer is omitted.
It doesn’t seem like there a whole lot of rules at the moment, but I think that’s kind of the point. And light contouring is still acceptable, as long as it doesn’t detract from the highlighters.
My Routine for Strobing
I have very dry skin, so I have focused on using cream products more so than powders.
Right now I have been loving the new Dare to Dream Pocahontas Retractable Luminizer in Great Spirit from Walgreens. It looks a little shimmery at first, but once it’s blended into the skin the highlighter is very natural, giving me just the right amount of shimmer without my face looking greasy.
Lately I haven’t been wearing any foundation, but after applying moisturizer and sunscreen I rely on concealer to very, very lightly contour my face. I use the discontinued e.l.f. Beauty Encyclopedia: Face Edition because it has four concealers that are just right for my skin tone. While I also have the e.l.f. Studio Complete Coverage Concealer in Light, I don’t use it for contouring because the shades are very light, too similar to one another, and match my skin too closely. There are three versions of the the Complete Coverage Concealer, so that might work for you if you can go up one shade darker. I lucked out that the concealers in the e.l.f. Beauty Encyclopedia worked for me.
I apply the darkest shade of the concealers from the Beauty Encyclopedia: Face Edition around the edge of my hairline, with more applied in the hollows of my cheekbones and along the upper sides of my nose. I apply the lightest shade under my eyes, along the top of my nose, on the chin, and as an upside down triangle on my forehead. I take the second lightest shade and apply it to my eyelids. Since the second darkest shade has pink undertones, I apply it along my cheekbones where I normally apply blush. I then take a blending sponge and lightly blend the products.
After applying a matte blush, I put the Disney Dare to Dream Pocahontas Retractable Luminizer in Great Spirit on my upper cheekbones, along the top of my nose, my chin, and as an upside down triangle to my forehead. I then use my fingers to lightly blend the highlighter into the skin. If any place looks a little greasy, I’m a little more emphatic about blending until it looks less shimmery.
As I’ve already stated, I really love this look. It’s very natural and glowy, and not pronounced like the usual contouring you see around the Internet.
Vegan-Friendly Options
Looking for some vegan-friendly options for strobing? Below are some suggestions.
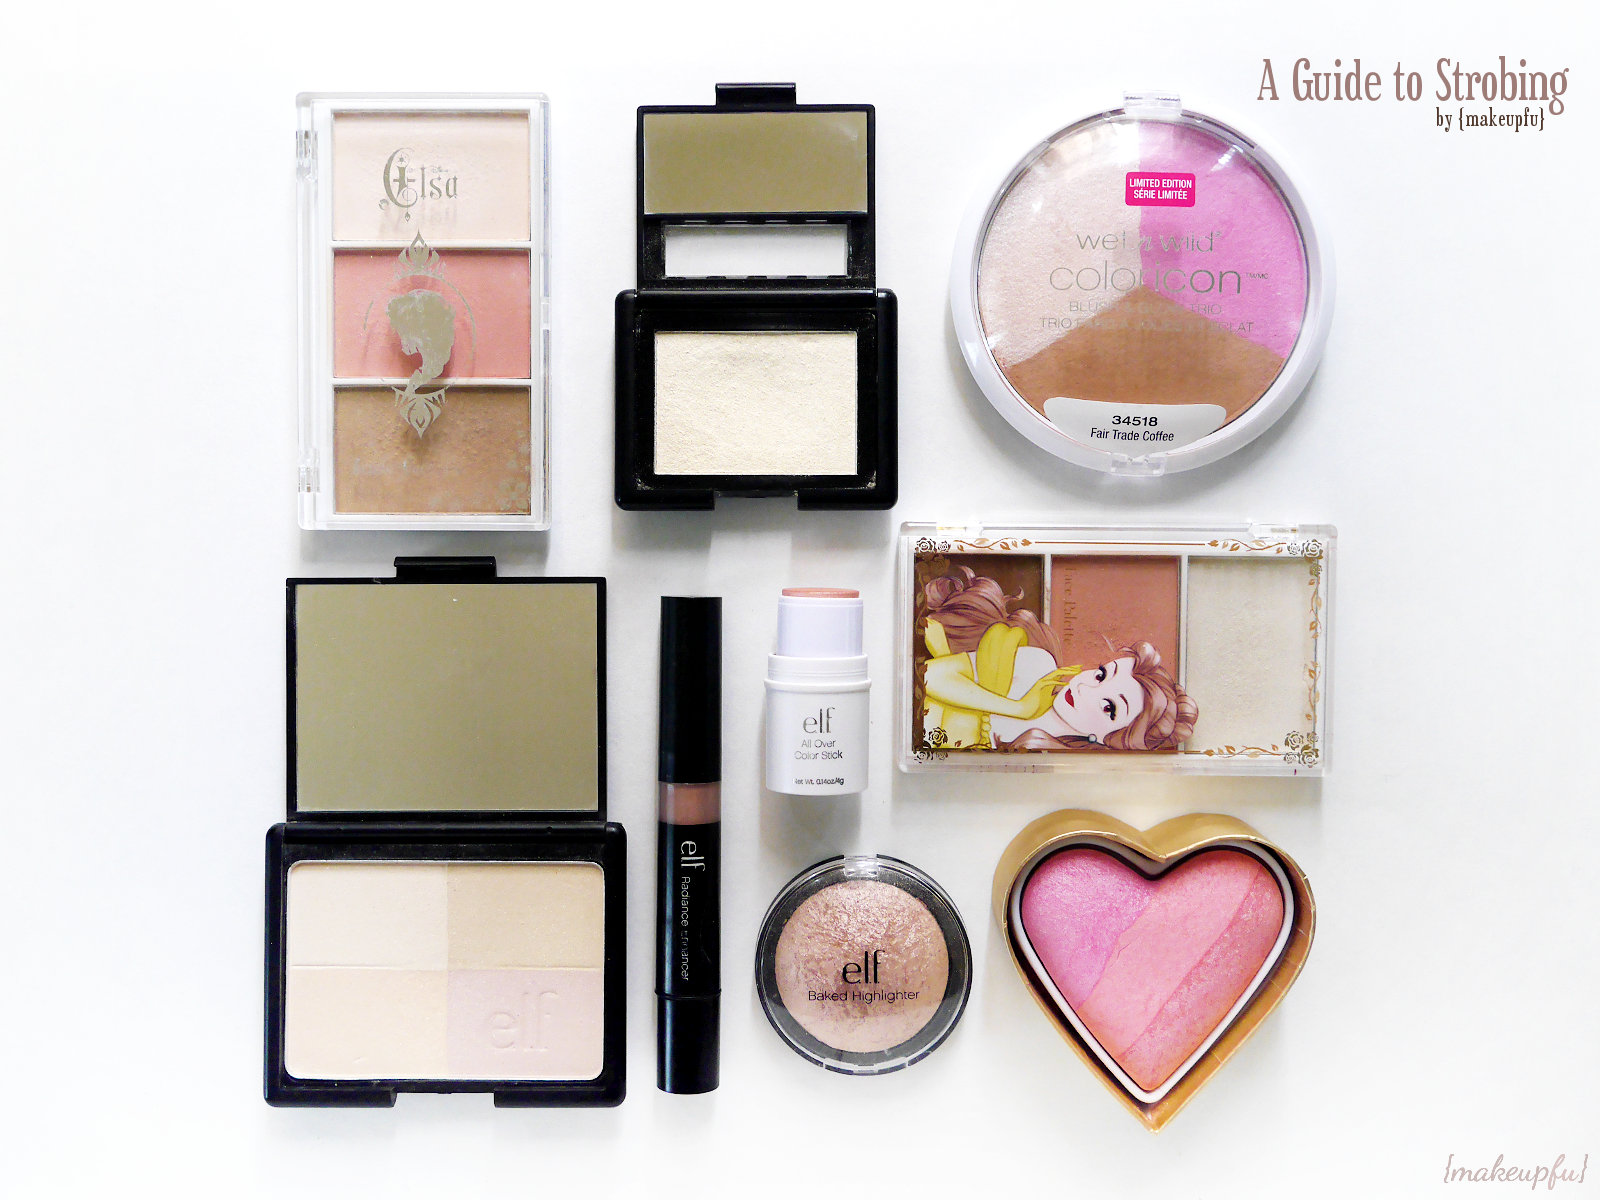
- Disney Dare to Dream Pocahontas Retractable Luminizer (not pictured). These bronzing and highlighting sticks feature two highlighting shades, a pink and light beige. Both should be suitable for most skin tones as they are fairly low in pigmentation and shimmer.
- e.l.f. Essential All Over Color Stick. There are several good colors to chose from in this budget highlighter, depending on one’s skin tone, including Spotlight, a white pearl for any skin tone, Golden Peach (now discontinued) for light, golden skin tones, and Persimmon for cooler skin tones.
- e.l.f. Essential Shimmering Facial Whip. This product shares many similar shades to the product above, but in a liquid form.
- e.l.f. Studio Blush in Gotta Glow for all skin tones, but especially light to medium skin tones and Giddy Gold for medium to darker skin tones with warm under tones. Both shades have a lot of shimmer, so be careful not to apply too much product.
- e.l.f. Studio Radiance Enhancer. I have Sunset, a pretty pearl shade with a shimmery lilac undertone, but there is also Spotlight, a traditional white pearl highlighter.
- e.l.f. Studio Tone Correcting Palette. The palette contains four different powder shimmer that can be used independently or swirled together. This is a very shimmery product, so it’s best to use lightly.
- e.l.f. Studio Baked Highlighter. I have Blushing Gems shown here, but there are two additional baked highlighters available. Also, if you have the e.l.f. Studio Baked Blush in Pinktastic, that could also make a good highlighter.
- e.l.f. Studio Shimmer Palette (not pictured). This cream palette contains four shimmers.
- e.l.f. Disney Princess Elsa and Belle Face Palettes. These LE products are found at Walgreens and online, each featuring a pretty highlighter. The Elsa Face Palette has a less shimmery pink highlighter with a lilac color shift, while the Belle Face Palette has a cream highlighter with golden shimmer. The Belle highlighter is super shimmery, so apply with a light hand.
- Too Faced Sweethearts Perfect Flush Blush in Candy Glow. This is a good highlighter for those with medium to dark skin tones.
- Wet n Wild LE ColorIcon Blush & Glow Trio. An LE product. Fair Trade Coffee and Sunset Junction are the two vegan-friendly shades. Each trio contains a suitable highlighter for strobing. The highlighter are very shimmery so use a light hand.
I have used the above products and feel all are suitable for strobing.
Finding a good matte blush is just as important as the right shimmer for this look. I recommend pairing the highlighters with vegan pressed blushes like the e.l.f. Studio Pressed Mineral Blush—my favroite is Sweet Retreat—and the Ofra blush in the shade Charm (I received it from one of the Petit Vour boxes). There is also the e.l.f. Studio Contouring Blush & Bronzer Palette in the shade Fiji that has matte versions of both the blush and light bronzer.
A couple of good cream blushes are GlamNatural’s Cream Blushes—my fave is Sun Kissed—and the e.l.f. Studio HD Blushes.
And that’s it! All you really need is a light matte blush and a proper highlighter, some time to practice, and you are ready to strobe.
How do you feel about this new makeup trend? Let me know below!


follow me!